Lightroom AI Denoise - Review - 24 Apr 2023
A few weeks ago Adobe came out with Lightroom Classic Ver. 12.3 that added a couple of new features, one of which was a new AI Denoise filter to apply noise reduction to original RAW files! This noise-reduction is a new addition to the Enhancement feature that Adobe released last year that allowed AI (artificial intelligence) to generate high-resolution images from original RAW files. Full description of version 12.3 improvements is described here.
A number of reviewers are describing their experiences online, including YouTube videos that I've found helpful. Anthony Morganti is a Lightroom Guru and describes the new AI Denoise feature in Lightroom 12.3. He also has follow-up video that helps answer the question of whether to apply the AI Denoise feature BEFORE or AFTER making adjustments in Lightroom*.
* - Quick answer is that Adobe recommends AI Denoise be applied BEFORE adjustments. I've found from my examples below that AI Denoise appears to add a touch of vibrance to images, and this added vibrance can appear overdone if you apply any vibrance adjustment before applying AI Denoise. Otherwise, I see no problems adjusting White Balance and Tone selections before applying AI Denoise.
Here is an image of a Hermit Thrush, expanded to 300% to show noise in the original image captured at ISO 6400. 41% Vibrance had been added to the image before applying the AI Denoise filter (top). After applying 20% AI Denoise to the image the resulting file looks noticeably cleaner (bottom) but shows some added vibrance (blue around the eye orbital and yellow at the gape of the bill).
Also note: Before applying the AI Denoise filter using the Enhance Review dialogue make sure to de-select the "Create Stack" box.
Because AI Denoise is NOT non-destructive the original RAW file will be converted to a DNG file. If the "Create Stack" box is selected then the original RAW file will disappear and be replaced with the "Enhanced-DNG" file. The Enhanced DNG file cannot be reset, and the original RAW file will need to be re-imported into Lightroom. By unselecting the Create Stack box both the new DNG and original RAW file will remain in Lightroom.
Also-Also Note: Processing time will vary depending upon your computer configuration. My Macbook Pro with the below configuration takes 1-2 minutes to process the noise reduction. Other systems may take as little as 30 seconds while still others can take 40 minutes, so this processing will greatly impact your workflow time and decision-making about using this new feature.
How does it compare?
I do not have access to the more popular Topaz Photo AI or DXO PureRAW packages for noise reduction and image enhancement but did find a couple of YouTube reviews worth watching:
Brian Matiash compares AI Denoise vs. Topaz Photo AI and provides his insights and commentary. Nick Page goes a step further and compares AI Denoise vs. Topaz Photo AI vs. DXO PureRAw. All three have their strengths (and weaknesses) but ultimately you'll want to decide for yourself what your preferred workflow will look like moving forward.
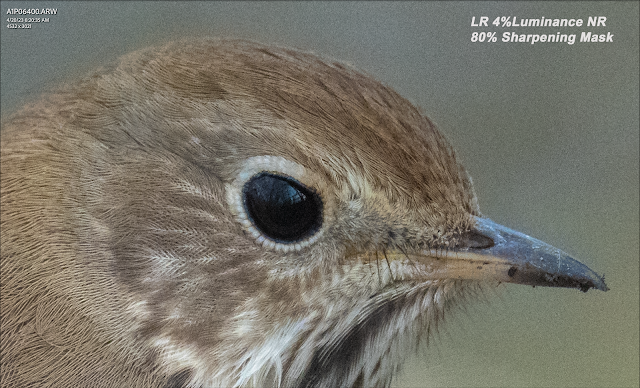
For me, I've used Imagenomic's Noiseware noise reduction software for years and have been very happy with it. My workflow typically involves applying initial Luminance Noise reduction (4-10%) in Lightroom Classic followed by an 80% Sharpening Mask. Here is a Hermit Thrush portrait expanded to 300% and shot at ISO 6400 before and after applying the manual noise reduction in Lightroom Classic:


Comments
Post a Comment